Are you tired of having your data spread out across multiple columns, making it difficult to analyze and understand? It can be overwhelming to have to constantly switch back and forth between columns, hunting for the information you need. This post will show you how to stack data from multiple columns to one column in Microsoft Excel Spreadsheet.
This article will introduce you the two methods. After reading the article below, you will find the two ways are verify simple and convenient to operate in excel.
In previous article, I have shown you the method to split data from one long column to multiple columns by VBA and Index function.
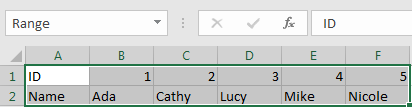
For example, see the initial table below:

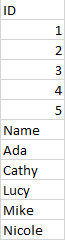
And we want reverse data into one column and make it looks like:
Now we can follow below two methods to make it possible. Let’s start it.
Table of Contents
1. Stack Data in Multiple Columns into One Column by Formula
Step 1: Select range A1 to F2 (you want to do stack), in Name Box, enter a valid name like Range, then click Enter.
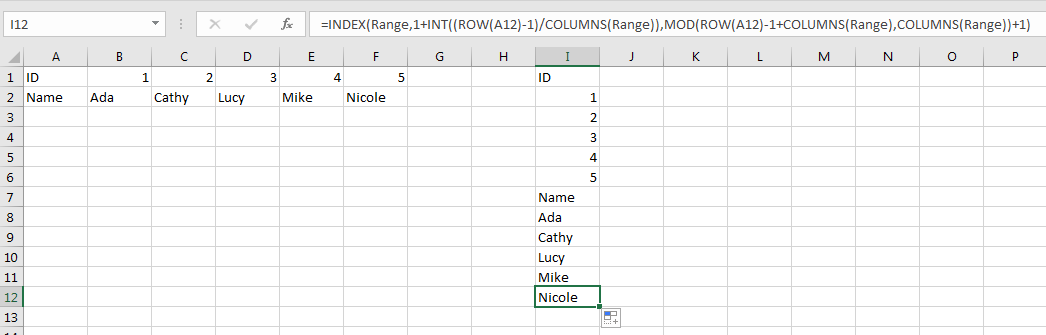
Step 2: In any cell you want to locate the first cell of destination column, enter the formula
=INDEX(Range,1+INT((ROW(A1)-1)/COLUMNS(Range)),MOD(ROW(A1)-1+COLUMNS(Range),COLUMNS(Range))+1).Please be aware that you have to replace ‘Range’ in this formula to your defined name in Name Box.

Step 3: Click Enter. Verify that ‘ID’ (the value in the first cell of selected range) is displayed properly.

Step 4: Drag the fill handle to fill I column. Verify that data in previous initial location is reversed to one column properly.
Note:
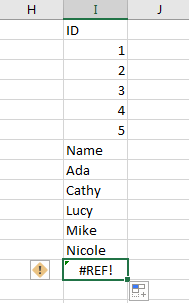
If you drag the fill handle to cells extend selected range cell number, error will be displayed in redundant cell.
2. Stack Data in Multiple Columns into One Column by VBA
Step 1: On current visible worksheet, right click on sheet name tab to load Sheet management menu. Select View Code, Microsoft Visual Basic for Applications window pops up.
Or you can enter Microsoft Visual Basic for Applications window via Developer->Visual Basic.
Step 2: In Microsoft Visual Basic for Applications window, click Insert->Module, enter below code in Module1:
Sub StackDataToOneColumn()
    Dim Rng1 As Range, Rng2 As Range, Rng As Range
    Dim RowIndex As Integer

    Set Rng1 = Application.Selection
    Set Rng1 = Application.InputBox("Select Range:", "StackDataToOneColumn",        Rng1.Address, Type:=8)
    Set Rng2 = Application.InputBox("Destination Column:", "StackDataToOneColumn", Type:=8)

    RowIndex = 0
    Application.ScreenUpdating = False

    For Each Rng In Rng1.Rows
        Rng.Copy
        Rng2.Offset(RowIndex, 0).PasteSpecial Paste:=xlPasteAll, Transpose:=True
        RowIndex = RowIndex + Rng.Columns.Count
    Next
    Application.CutCopyMode = False
    Application.ScreenUpdating = True
End Sub
Step 3: Save the codes, see screenshot below. And then quit Microsoft Visual Basic for Applications.
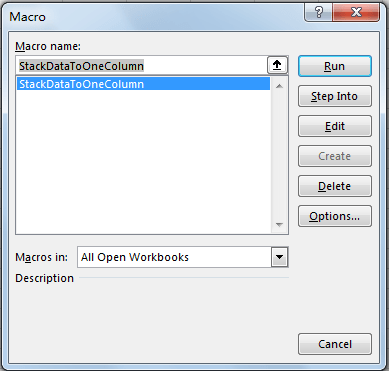
Step 4: Click Developer->Macros to run Macro. Select ‘StackDataToOneColumn’ and click Run.
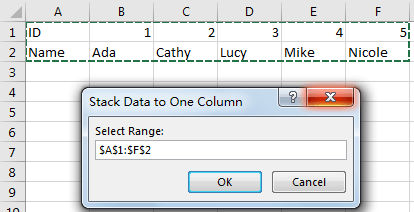
Step 5: Stack Data to One Column dialog pops up. Enter Select Range $A$1:$F$2. Click OK. In this step you can select the range you want to do stack.
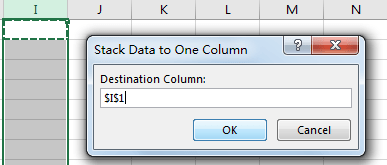
Step 6: On Stack Data to One Column, enter Destination Column $I$1. Click OK. In this step you can select the first cell from destination range you want to save data.
Step 7: Click OK and check the result. Verify that data is displayed in one column properly. The behavior is as same as the result in method 1 step# 4.

3. Merge Cells into One in Excel
To merge or consolidate cells in Microsoft Excel, follow these steps:
Step 1: Select the cells you want to merge.

Step 2: Right-click on the selected cells and choose “Merge Cells” from the context menu.
Step 3: Alternatively, you can click on the “Merge & Center” button in the “Alignment” section of the “Home” tab on the ribbon.

4. Combine two columns in excel without losing data
To combine two columns in Microsoft Excel without losing data, you can use the following formula:
Step 1: In a new column C1, enter the following formula:
=A1 & B1
If you want to combine data from two or multiple cells in Excel, you can also use this formula.
Step 2: Press Enter to apply the formula.

Step 3: Drag the formula down to the end of the data in the columns.

The formula uses the & operator to concatenate the contents of two cells. In this example, the formula combines the contents of cells A2 and B2 into a single cell. By dragging the formula down, you can combine the contents of all the cells in the two columns.
You can also use the CONCATENATE function to combine columns, which works in a similar manner. The formula would look like this:
=CONCATENATE(A1, B1).
5. Combine 2 Columns with a Space
If you want to combine two columns with a space between them, you can use the following formula:
=A1 & " " & B1In this example, the formula combines the contents of cells A1 and B1 into a single cell, separated by a space. By dragging the formula down, you can combine the contents of all the cells in the two columns.
6. Append Columns in Excel
If you want to append two columns in Microsoft Excel, just follow these steps:
Step 1: Select the first column of data that you want to append.

Step 2: Right-click on the selected cells and choose “Copy” from the context menu.

Step 3: Select the second column of data that you want to append, and right-click on the first cell in the column.

Step 4: Choose “Insert Copied Cells” from the context menu.


This will insert a copy of the first column of data after the second column, effectively appending the two columns.

7. Conclusion
Stacking data from multiple columns into one is a useful operation in Microsoft Excel when you need to combine and analyze data from different sources. The process can be easily achieved by using the built-in functions such as the & operator or the CONCATENATE function, which allow you to concatenate the contents of multiple cells into one.
Hope you can like this post.
8. Related Functions
- Excel INDEX function
The Excel INDEX function returns a value from a table based on the index (row number and column number)The INDEX function is a build-in function in Microsoft Excel and it is categorized as a Lookup and Reference Function.The syntax of the INDEX function is as below:= INDEX (array, row_num,[column_num])… - Excel ROW function
The Excel ROW function returns the row number of a cell reference.The ROW function is a build-in function in Microsoft Excel and it is categorized as a Lookup and Reference Function.The syntax of the ROW function is as below:= ROW ([reference])…. - Excel MOD function
he Excel MOD function returns the remainder of two numbers after division. So you can use the MOD function to get the remainder after a number is divided by a divisor in Excel. The syntax of the MOD function is as below:=MOD (number, divisor)…. - Excel INT function
The Excel INT function returns the integer portion of a given number. And it will rounds a given number down to the nearest integer.The syntax of the INT function is as below:= INT (number)… - Excel COLUMNS function
The Excel COLUMNS function returns the number of columns in an Array or a reference.The syntax of the COLUMNS function is as below:=COLUMNS (array)….