This post will guide you how to remove duplicate rows from a Microsoft Spreadsheet.
- Remove Duplicate Rows with Remove Duplicates Command
- Remove Duplicate Rows with Advanced Filter
- Remove Duplicate Rows with Formula
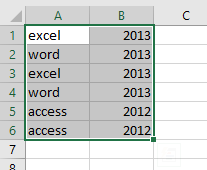
Assuming that you have a list of data in range A1:B6 in which contain duplicate rows, and you want to remove them and just keep the unique row. This post will show your three methods to remove duplicate rows.
Table of Contents
Remove Duplicate Rows with Remove Duplicates Command
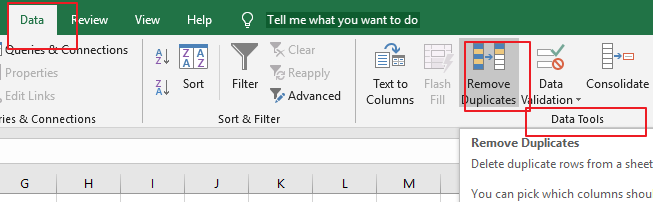
The easiest way of removing duplicate rows from a selected range is to use the Remove Duplicates command. Just do the following steps:
Step1: select the range that you want to remove duplicate rows.
Step2: go to Data tab in the Excel Ribbon, and click Remove Duplicates command under Data Tools group. And the Remove Duplicates dialog will open.
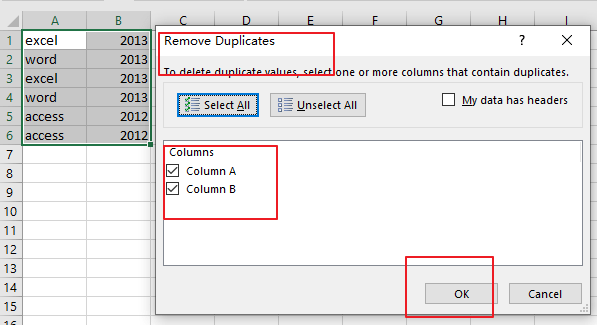
Step3: checked all column options under Columns list box, and click Ok button. (Note: the dialog box will allow you to select which columns that your range that you want to be included)
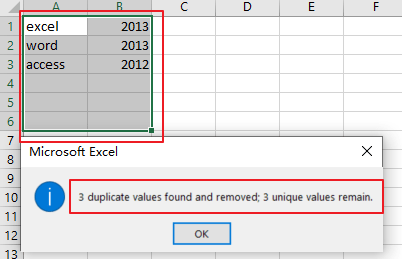
Step4: you would see a prompt box and it will inform you that how many rows is removed and how many unique rows is remaining.
Remove Duplicate Rows with Advanced Filter
You can also use Advanced Filter feature to filter unique rows in a Microsoft Excel Spreadsheet and copy the last result to a new range. Just do the following steps:
Step1: select the range that you want to remove the duplicate rows from.
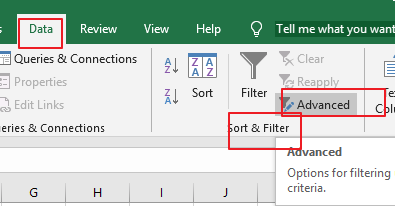
Step2: go to Data tab, and click Advanced command under Sort & Filter group. And the Advanced Filter dialog will appear.
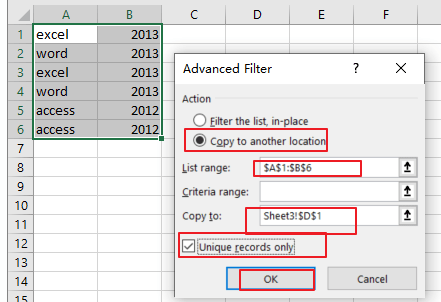
Step3: select the option Copy to another location in the Advanced Filter dialog box. You need to make sure that the selected range has been entered into the List range text box. And then select one blank cell in the Copy to list box as the new location. Make sure to check the Unique records only box. Click Ok button.
Step4: the newly range has been created without duplicate rows.
Remove Duplicate Rows with Formula
You can also use Excel formulas to accomplish the same result. And you can concatenate all columns into one column, and you can find the duplicates values in the combined column. And then you can use another column based on the COUNTIF function to calculate the number of occurrences of each value in another column. Then filter the count number that is greater than 1. And just delete those filtered rows. It should be duplicate rows. Let’s see the below steps:
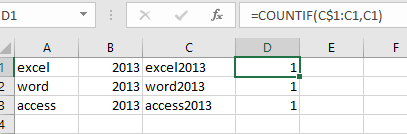
Step1: select a single cell adjacent to your data, such as: C1. Then enter the following formula into cell C1, and press Enter key. Then you need to copying this formula down all other rows to apply this formula.
=A1&B1
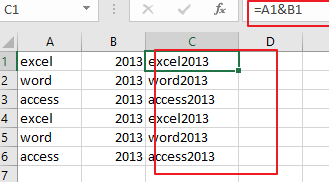
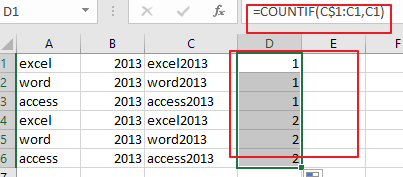
Step2: the contents of columns A-B have been concatenated into column C, and then you need to find the duplicates in the combined column C with another formula based on the COUNTIF function. Select another single cell adjacent to the column C. such as: cell D1, enter the following formula, and copying this formula down all other rows.
=COUNTIF(C$1:C1,C1)
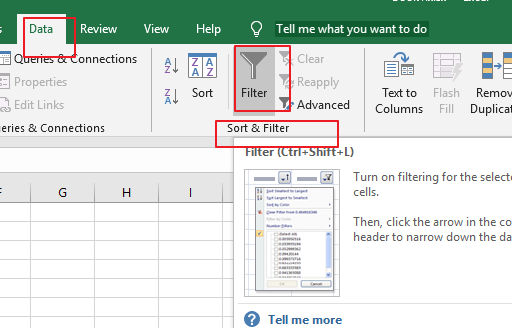
Step3: keep to select column D, and go to Data tab, click Filter button under Sort &Filter group. And one filter arrow will be added into the cell D1.
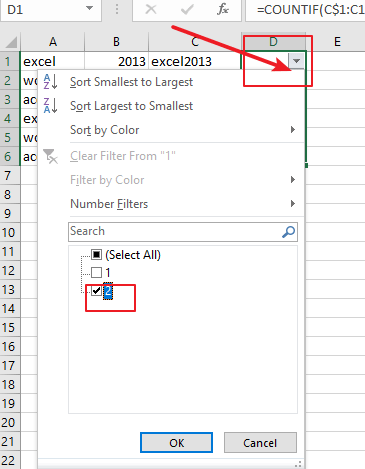
Step4: click on the Filter arrow in cell D1, and select rows that are not equal to 1, it means that uncheck the value 1. Click Ok button.
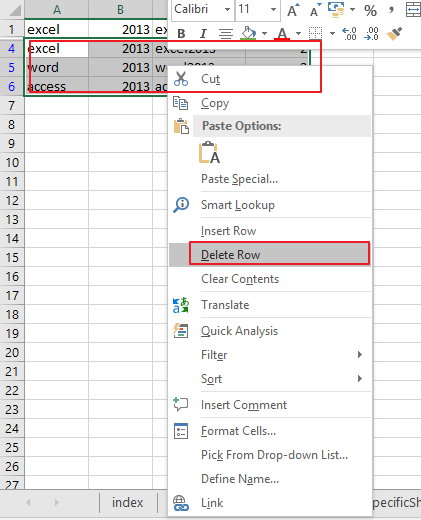
Step5: you would see that the first occurrence of every row is hidden. And only duplicate rows are displayed. Then select all filtered rows, and right click on it, click Delete Rows from the popup menu list.
Step6: remove the filter from the column D.
Related Functions
- Excel COUNTIF function
The Excel COUNTIF function will count the number of cells in a range that meet a given criteria. This function can be used to count the different kinds of cells with number, date, text values, blank, non-blanks, or containing specific characters.etc.= COUNTIF (range, criteria)…
Leave a Reply
You must be logged in to post a comment.