Are you want to add multiple rows between two rows in your worksheet? Whether Excel provide some built-in functions to insert multiple blank rows or hundreds of rows at once? sure! There is a handy INSERT option that can save you time and effort. You can also quickly insert multiple rows with a keyboard shortcut.
You can also use another good way Name Range Box, it not only helps you navigate through your spreadsheet but also streamlines the process of inserting multiple rows.
You will learn how to use different ways with simple steps to insert multiple rows in Excel 2013/2016/2019/365. So, let’s dive in and discover the time-saving techniques to insert multiple rows in Excel.
Table of Contents
- 1. Insert Multiple Rows using INSERT Option
- 2. Insert Multiple Rows using Right-click Menu Option
- 3. Insert Multiple Rows using Short Cut Key
- 4. Insert Multiple Rows using Name Box (inert 10 or 100 rows)
- 5. Insert Multiple Rows using Insert Copied Cells Feature
- 6. Insert Rows In Between Other Rows
- 7. Video:Insert Multiple Rows with Different Ways in Excel
1. Insert Multiple Rows using INSERT Option
To easily insert multiple rows in Excel, you can use an built-in feature INSERT option to do it. Just see the below steps:
Step1: you need to locate the row above which you want to insert the new rows in your data table.
Step2: simply click on the row label to select entire row. This highlights the row and prepares it for the insertion of multiple rows.
Suppose you want to insert two rows, and you need to select two rows firstly.
Note: you can also use shortcut Shift +Space to select entire rows.
Step3: go to Home tab, click on Insert button under cells group. It should be display a drop-down menu list.
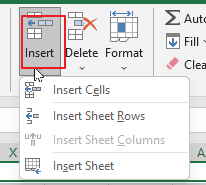
Step4: choose Insert Sheet Rows menu from the drop down menu list.
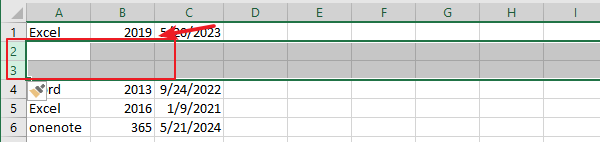
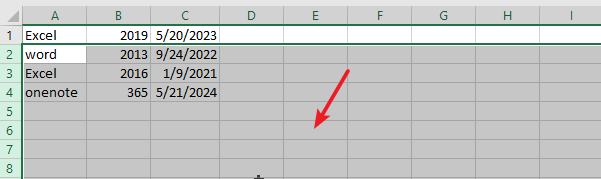
Step5: Excel will immediately insert the desired number of blank rows above the selected row, shifting the existing rows downward.
Now you can repeat the process as needed to insert more rows in different sections of your worksheet.
2. Insert Multiple Rows using Right-click Menu Option
Let’s see how to use Insert menu by right clicking on the selected cells in adjacent rows to insert multiple rows in Excel. Just do the following steps:
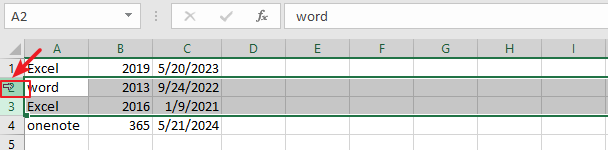
Step1: you need to locate the row above which you want to insert the new rows firstly, such as, select Cell B2.

Step2: if you want to insert two new rows above the selected rows you located, you just need to select range of cells B2:B3.

Step3: right-click on the selected cells. A context menu will appear.
Step4: From the context menu, choose the Insert option. You should see a Insert dialog box on your screen.
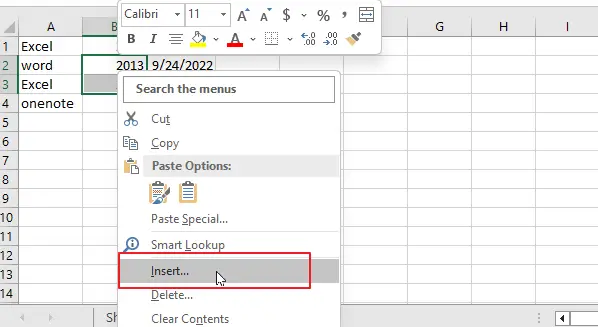
Step5: select Entire row option in the Insert box, and click Ok button.
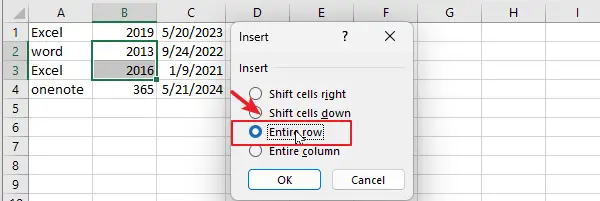
Step6: Excel will instantly insert the specified number of blank rows above the selected row to your spreadsheet, pushing the existing rows downward.
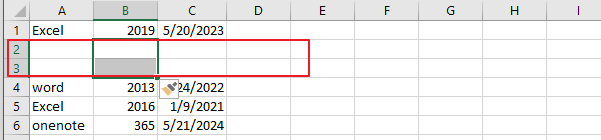
Repeat the process as necessary to insert more rows in different sections of your worksheet.
3. Insert Multiple Rows using Short Cut Key
The below steps will show you how to quickly insert multiple rows using some Excel shortcut keys.
Step1: you must firstly select the cell above which you want to insert new rows in your spreadsheet. Suppose you want to insert two or more rows, just select those many cells, such as, select two cells, B2:B3.

Step2: select the entire row by pressing the shortcut key Shift + Space(holding the Shift key, press the Spacebar key). This action selects the entire row.

Step4: Now, you can click on another shortcut key Ctrl +Shift + + (plus key) to insert new rows.
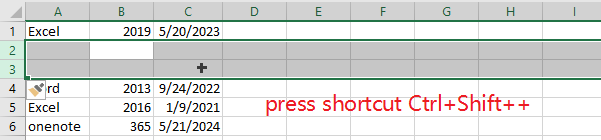
Step5: It will automatically insert the desired number of blank rows above the selected row.
By following these simple steps and utilizing the shortcut keys, you can efficiently insert multiple rows in Excel.
4. Insert Multiple Rows using Name Box (inert 10 or 100 rows)
If you want to insert more than 100 rows above the give cell or row you have selected. and if you use the above methods, it will take lots of time to select those many rows or cells and then insert more than 100 rows using shortcut keys. Is there a good method to quickly select many rows? sure!
This tutorial will show you how to select many rows quickly using Name Range box and then insert multiple rows using shortcut. Just see the below steps:
Step1: you must firstly select the cell above which you want to insert new rows in your spreadsheet. such as, Cell B2.

Step2: click on Name Range box, enter the reference of the row where you want to insert the new rows. For example, if you want to insert 100 rows above cell B2, just enter 2:102 in the Name Range box and press Enter key.

Step3: you will see rows 2 to rows 102 have been selected.
Step4: Now, you can click on another shortcut key Ctrl +Shift + + (plus key) to insert 100 new rows above row 2.
Step5: It will automatically insert the desired number of blank rows above the selected row.
5. Insert Multiple Rows using Insert Copied Cells Feature
Can you believe that you can also use Copy and Paste feature to insert multiple rows in Excel? you will learn how to insert multiple rows using the Insert Copied Cells option with the following steps.
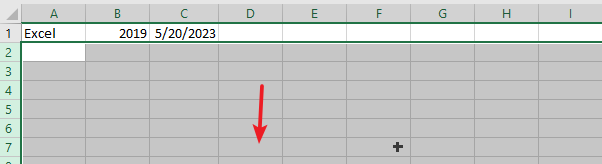
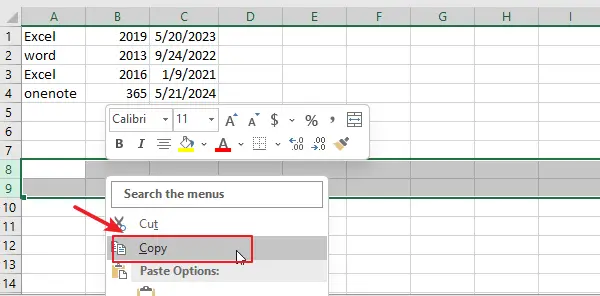
Step1: select one or more blank rows in your spreadsheet, and right click on it and choose Copy option from the context menu. it will copy the selected blank rows.
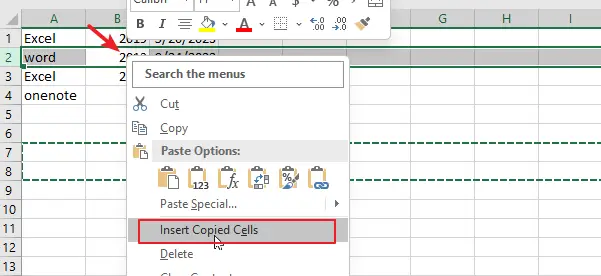
Step2: select the cell above which you want to insert new rows in your spreadsheet. such as, Cell B2. Then press Shift + Space shortcut to select the entire row.

Step3: Once the desired cell or row is selected, and right click on it, choose the Insert Copied Cells option from the context menu.
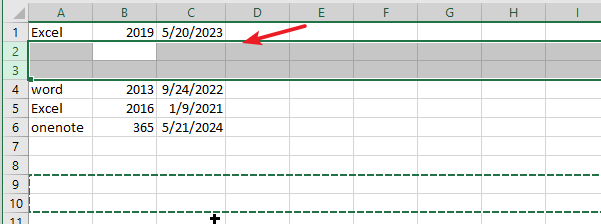
Step4: It will automatically insert all copied blank rows above the selected row.
6. Insert Rows In Between Other Rows
If you need to insert a blank row between every other row in the spreadsheet. You can use the helper column in combination with Sort & Filter feature to achieve your result.
Refer to the below steps:
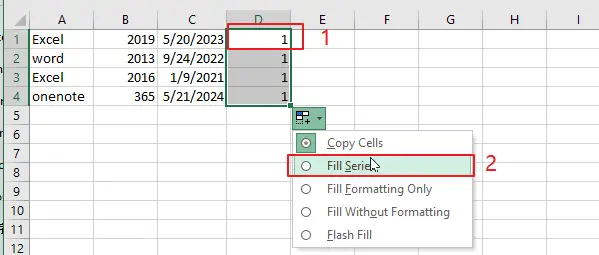
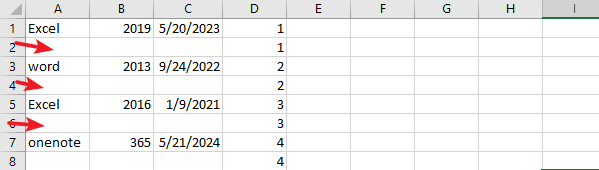
Step1: Insert unique identifier or numbering to each row next to your data. The number should be in ascending order. Insert 1 in the helper column of the first row, drag AutoFill Handler down to other cells, select Fill Series option.
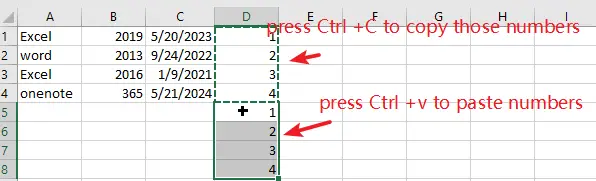
Step2: copy all of numbers in the helper column, just press Ctrl +C, and then paste them below the last serial number.
Step3: select the entire data, including all numbers in the helper column.

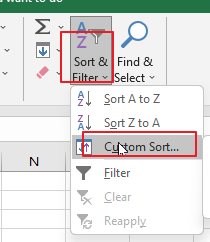
Step4: go to the Home tab, click Sort & Filter command under Editing group, and select Custom Sort menu from the drop down menu list. You will see a Sort dialog box will open on your screen.
Note: you can also press Alt +D +S to open Sort dialog box.
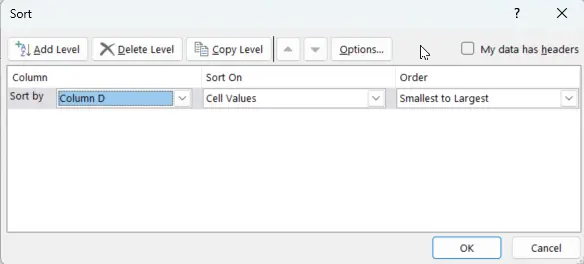
Step5: select helper column from the dropdown list of Sort by. Select Cell Values under Sort On dropdown list, and set Smallest to Largest option under Order dropdown list.
Step6: click on the OK button. You should see that one blank row have been added after every other rows in your data.
Step7: if needed, you can delete help column now.
7. Video:Insert Multiple Rows with Different Ways in Excel
This tutorial will guide you through these methods, allowing you to effortlessly expand your spreadsheet and keep your data well-organized.
Leave a Reply
You must be logged in to post a comment.