Sometimes we add sequence number in the first column for each row in a table, for example create a table for saving student info, and one student one row. If I insert a new student info or delete an existing student info, the sequence numbers for rows are cut off and not continuous anymore. If we want to make these numbers are still continuous automatically after inserting or deleting rows, do you have any tricks? Actually, there are some methods you can follow to update sequence number for rows automatically, this article will introduce you two methods to implement this.
Precondition:
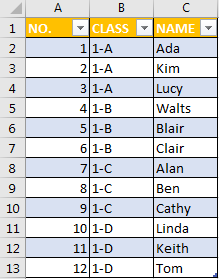
See table below. In first column, there are sequence numbers for rows.
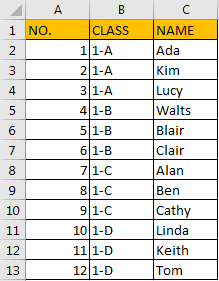
If we insert a new row or delete an existing row from the table, obviously numbers are not continuous. So, we need to know the method to update sequence number automatically.
Table of Contents
1. Update Sequence Number for Rows Automatically by Formula
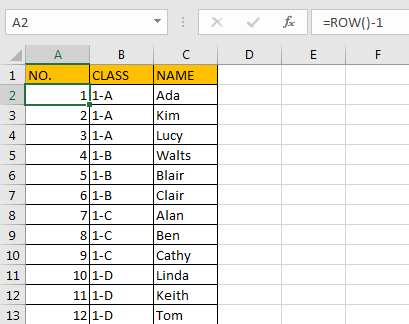
Step1: You can see that except the header, sequence number for each row equals to row number minus 1. So, we can use =ROW()-1 to get sequence number here. In B2 enter the formula =ROW()-1. Then drag it down to fill other cells till A13.
Please notice that if there is no header in table and sequence number is started in A1, you can just enter =ROW() here.
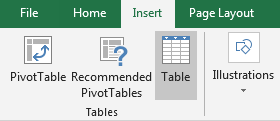
Step2: Create table for this table. Select this table, click Insert tab in ribbon, click Table.
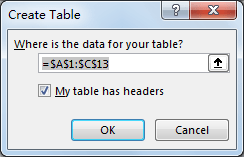
Verify that Create Table dialog pops up. As table range is already selected, so $A$1:$C$13 is auto selected, and option ‘My table has headers’ is checked by default. Click OK.
Verify that table is created and table style is updated. Now, after creating table, sequence number will be automatically updated.
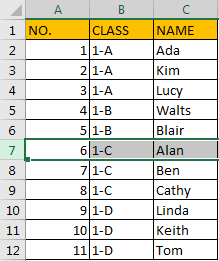
Step3: Try to insert a new row between number 6 and 7.
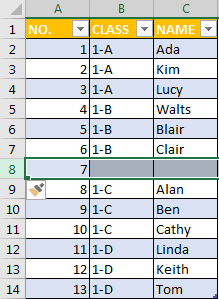
Verify that sequence number is updated automatically.
Step4: Try to delete an existing record.
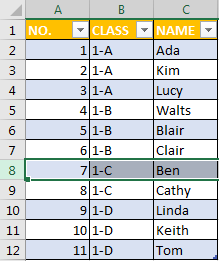
Verify that sequence number is updated automatically.
2. Update Sequence Number for Rows Automatically by VBA Code
Notice: If you want to only delete row from table and then automatically update sequence number, you can also edit VBA code to implement this.
Step1: On current visible worksheet, right click on sheet name tab to load Sheet management menu. Select View Code, Microsoft Visual Basic for Applications window pops up.
Or you can enter Microsoft Visual Basic for Applications window via Developer->Visual Basic. You can also press Alt + F11 keys simultaneously to open it.
Step2: In Microsoft Visual Basic for Applications window, enter below code:
Private Sub Worksheet_Change(ByVal Target As Range)
    Dim lastRow As Long
    Dim i As Long
    Dim rng As Range

    ' Define the specific range A2:A13
    Set rng = Range("A2:A13")

    ' Check if the change occurred within the specified range
    If Not Intersect(Target, rng) Is Nothing Then
        Application.EnableEvents = False
        On Error Resume Next
        ' Get the last row with data in the specified range
        lastRow = rng.Cells(rng.Rows.Count, 1).End(xlUp).Row

        ' Update sequence numbers for the specified range
        For i = 1 To lastRow - 1
            rng.Cells(i, 1).Value = i
        Next i

        On Error GoTo 0
        Application.EnableEvents = True
    End If
End Sub
Step3: Try to delete an existing record.
Verify that sequence numbers are still continuous after updating. As you insert or delete rows in column A, the sequence numbers will automatically update. Adjust the code as needed for your specific requirements.
3. Video: Update Sequence Number for Rows Automatically
This Excel video tutorial, where we’ll explore smart ways to automatically update sequence numbers after inserting or deleting rows. Join us as we delve into two methods – the ROW function and VBA code.