This post will guide you how to convert dd-mm-yyyy test string or a date to a standard date format mm/dd/yyyy with a formula in Excel.
Table of Contents
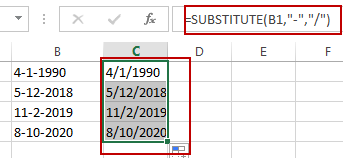
1. Convert Text DD-MM-YYYY to Date Format
Assuming that you have a list of data in range B1:B4 which contain text dates. And you need to convert these text dates to the standard date format mm/dd/yyyy. How to achieve it. You can use a formula based on the SUBSTITUTE function to achieve the result. Like this:
=SUBSTITUTE(B1, "-","/")Type this formula into a blank cell and press Enter key in your keyboard, and then drag the AutoFill Handle over to other cells to apply this formula.
Method 2 – Using VBA Macro
For users who prefer a more automated approach or are working with large datasets, our second method involves writing a VBA macro. This method is ideal for those who want to save time and perform batch conversions with a single click.
To start, access the Visual Basic for Applications editor by pressing ALT + F11. This integrated development environment allows you to write and run VBA code, automating tasks within Excel.
In the VBA editor, right-click on any of the items in the Project Explorer, usually the name of your workbook, and select Insert menu and choose Module submenu. A new module appears in the code window.
Copy and Paste the code into the new module you just created in the VBA Editor.
Sub ConvertDateFormat()
    ' Declare variables
    Dim sourceRange As Range
    Dim destinationCell As Range
    Dim cell As Range
    Dim newDate As Date
    Dim dateStr As String

    ' Prompt user to select a source range containing dates
    Set sourceRange = Application.InputBox("Click on the range containing dates in DD-MM-YYYY format", "Select Source Range", Type:=8)
    If sourceRange Is Nothing Then
        MsgBox "Selection cancelled. Please run the macro again.", vbInformation
        Exit Sub
    End If


    ' Prompt user to select a destination cell
    Dim result As Range
    Set result = Application.InputBox("Click on the cell where you want to output the converted date", "Select Destination Cell", Type:=8)
    If result Is Nothing Then
        MsgBox "Selection cancelled. Please run the macro again.", vbInformation
        Exit Sub
    End If

    ' Ensure only one cell is selected as destination
    If result.Count <> 1 Then
        MsgBox "Please select a single cell as the destination.", vbExclamation
        Exit Sub
    End If

    ' Set the destinationCell to the selected cell
    Set destinationCell = result

    ' Loop through each cell in the source range
    For Each cell In sourceRange
        ' Check if the cell value can be converted to a date
        If IsDate(cell.Value) Then
            ' Convert DD-MM-YYYY to MM/DD/YYYY
            newDate = DateValue(cell.Value)
            dateStr = Format(newDate, "MM/DD/YYYY")
            ' Output the converted date to the destination cell
            destinationCell.Value = dateStr
            ' Prepare for the next iteration (if needed)
            Set destinationCell = destinationCell.Offset(1, 0)
        Else
            MsgBox "The selected range contains non-date values. Please ensure all values are in DD-MM-YYYY format.", vbExclamation
            Exit Sub
        End If
    Next cell

    MsgBox "Date conversion is complete.", vbInformation
End Sub
Before running the macro, it’s a good practice to save your workbook. Go to File and then click Save in Excel to ensure your workbook is saved with macros enabled (.xlsm file type). Go back to Excel. Press ALT + F8 to open the “Macro” dialog box.
You will see a list of all macros in the workbook. Select ConvertDateFormat from the list. Click “Run” to execute the macro. This will trigger the VBA code to run.
The macro will display an input box asking you to select the source range containing the dates in DD-MM-YYYY format. Click and drag to select the appropriate cells, then click OK.
If you selected a valid range, another input box will appear asking you to select the destination cell where you want the converted dates to be placed. Click on the cell to select it and press Enter.
After you’ve selected the destination cell, the macro will process the conversion and display a message box indicating the completion of the task.
The destination cell will now contain the converted date in the MM/DD/YYYY format.
3. Video: Convert DD-MM-YYYYY to Standard Date Format
This Excel video tutorial will guide you how to convert date formats in Excel. We will explore two effective methods for transforming dates from the DD dash MM dash YYYY format to the standard mm slash dd slash yyyy format. Whether you prefer a simple formula or a more automated approach using VBA macros, we’ve got you covered to streamline your data formatting tasks.
Leave a Reply
You must be logged in to post a comment.